Tuesday 27 March 2012

Rugby Cake

I made a rugby theme cake for a friend and for the first time made an icing character!
This cake was the first personalised cake I have made and I was happy with the outcome.

I made a 10 inch square sandwiched cake with a buttercream and jam filling and covered the cake with green icing. I made a rugby player out of icing and decorated him in the colours of the team; red and yellow.

I made the goal posts out of candy sticks but this wasnt the greatest success as they were not big enough so I had to join two together vertically for the left and right side of the goal post and also two for the centre bar but this kept collapsing due to the weight of the candy sticks. If I were to make the cake again I would use a different technique; practise makes perfect!

Wedding Cupcake Bouquet...

I made some cupcake bouquets for a family member to share with her bridesmaids and maid of honour on the morning of her wedding. I gathered a few ideas from the internet and started the cupcake bouquets from scratch.
To make a cupcake bouquet you will need a vase/plant pot, cocktail sticks or cupcake metal holders, tissue paper of your choice and ribbon if desired and plant foilage. You will also need polestyrene balls or blocks to fill the vase with.

I used a cheap plastic plant pot from a local store and ordered polystyrene balls, metal cupcake holders and fake plant foilage off ebay. I used the colours cream and brown for the tissue paper and ribbon as these were the colours my cousin was having for the wedding.

I wrapped the pot in cream tissue paper and sealed it with a brown ribbon. I then put the polystyrene ball in the top of the plant pot with a sheet of tissue paper under it. I spaced out the metal holders evenly and pierced them through the polystyrene ball. I then used the foilage and placed leaves and flowers in the gaps between each metal holder.

After cooking some cupcakes and decorating them with chocolate fudge frosting or pale gold buttercream, I placed them in the metal holders. If there were any more gaps, I filled them with some extra foilage.


Tuesday 13 March 2012

Cupcake Bouquet

Something I really want to try out next is making a cupcake bouquet. I think they look amazing and are a great alternative to flowers. I have posted a few pictures of cupcake bouquets I like below and these have given me great ideas for an upcoming project I have.


Wish me luck!!

Butterfly iced cupcakes...

I made these butterfly decorated cakes to go alongside my niece's birthday cake. I added a strawberry flavouring to the pink buttercream and piped it on to vanilla cupcakes. Quick and easy to make. Baking time 20mins and once cooled decorating took around 15mins.

I piped these cakes from the centre and worked my way out to the edges to give the effect that can be seen in the above photo.

With my left over buttercream I made some princess cakes decorated with disney princess rice paper decorations which are ideal for any little girls party.

Piping bag nozzle sets...

I bought a new piping nozzle set for decorating off ebay for around £15 just like the one in the picture and it is a god send! It has so many different nozzles and each nozzle type in different sizes. I use these nozzles with disposable piping bags as I find them more hygienic and are cheaper! I ususally buy these in bulk on ebay aswell for next to nothing and they can be cut to size and are easy to grip.

I had a Tala piping bag before but found it never washed up very well and was difficult to clean so I was glad to get rid of it!

I would really recommend buying a set like this as it has the most popular nozzle shapes in it and it is likely you will not need to buy any other nozzle unless there is a special design for which you require a specific nozzle.

Buying a bulk set like this also probably works out cheaper than buying nozzles seperately and having all the nozzles in one box makes them easy to keep all in one place, easy to store and reduces the chance of losing one!

Monday 12 March 2012

Barbie Doll Cake...

Its already March.. this year is flying by!
March this year brings a lot of cake making for me.. my nieces birthday, cousins wedding, mothers day and my dads birthday! It looks like Im going to be a very busy bee!!!
My niece was 2 at the beginning of the month so I decided to make her a birthday cake fit for a princess... a Barbie Doll cake. These cakes are a great idea for any little girl who loves Barbies or dolls.

I got the idea off the Internet and as always, I tutored myself on how to do the cake. I watched a few videos on YouTube and remembered the important bits so I would know what to do when it was time to make the cake.

I made a basic vanilla sponge cake mix and baked it in a Pampered Chef glass jug like the one in the picture below (but without the lid!) . Once the cake was baked and cooled I turned the cake upside down which gave a dome shape, this was the barbies dress. I cut the dome shaped cake through the middle and spread buttercream onto one side and jam on the other then sandwiched them back together (like a victoria sponge cake)
I then made a circular hole in the top of the cake to insert a real Barbie Doll. The doll I got was on a skewer from the waist down so was easy to insert however a full barbie doll can be used and if the legs are wrapped tightly in clingfilm, the recipient of the cake can keep the doll afterwards which is great for small girls. I then coated the whole outside of the cake with buttercream to help seal the fondant icing when it was put on.

Before inserting the barbie doll, I covered the cake with the first layer of fondant icing. I went for a real girly Barbie look so went for all pink decorations. I used two shades of pink icing, a vibrant fushia pink and a baby pink shade. I used the fushia pink as the first layer of the dress and the baby pink for the overlay.

I rolled out the fushia pink icing so it was large enough to cover the circumference of the cake and placed it loosely over the cake, gently pinching it in certain places to give it the look of a ruffled flowing dress. I thought this would be more difficult than it was... it seemed to just curl and fold at the right places. With a little tweeking and trimming I was happy with the first layer of icing.

I then inserted the Barbie skewer and added the second layer of icing which gave the effect of a second layer to the dress. I cut the icing in a pattern so that it had circular edges, like a layer of lace ruffled on a wedding dress and pasted it on top of the first layer of icing. I then added some fondant flowers to the dress as decorations and piped buttercream around the bottom edge of the dress to give it a neat finish. I iced the Barbie Dolls body and created sleeves on the doll made out of buttercream. I also tied a pink bow around her waist and tied it round the back so the bow draped down the back of her dress; a nice final touch.


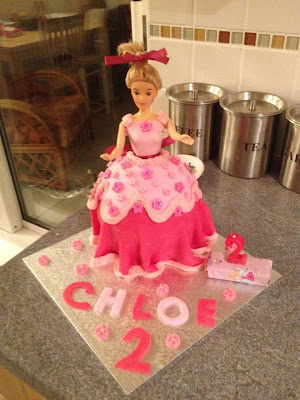
I was very happy with the end result and would recommend making this cake for any little girl's birthday!! There are lots of variations to this recipe so if a girl has a favourite disney princess, the decorations could be altered to make it look like that princess. I love the one below of the Little Mermaid and might try to make this in the near future as I think it looks amazing.


Friday 9 March 2012

Everyone loves the cookie monster...

I saw the idea for these cupcakes on Youtube and thought they looked brilliant!!... Cookie Monster Cupcakes...

Ingredients were easy to get hold of.. all that was needed to deocrate them was blue food colouring, desicated coconut (which I found in Tesco), white chocolate buttons, black icing or an icing pen and cookies (I used maryland cookies)

I used a basic vanilla cupcake recipe for the cakes themselves.. but it could be adapted to chocolate ones or whatever you fancy really!

To decorate I made a bowl of blue butter icing (stork marg + icing sugar+ blue food colouring) and I coated each cake in this. Then I put desicated coconut into a freezer bag and added a few drops of blue food colouring, sealed the bag and shook it until the coconut absorbed the blue colour. I then poured the dyed coconut into a bowl and I dipped all the cakes into it until they were coated. It is at this stage that the mouth needs to be made. I used a sharp knife and cut a section out of the cake in the shape of a mouth, deep enough to fit half a cookie. I removed the spare sponge and filled the space with a cookie. I them topped each cake with two white chocolate buttons to imitate eyeballs and used a black icing pen to make pupils.

And this was the result....

I took these cakes into work and my collegues loved them!! And best of all they all knew who the character was straight away... Priceless!

February...

February came around fast... and what is February associated with? Valentines day!! I use every commercial holiday and over priced/excuse for presents day as an opportunity to make cakes relating to that day! Also being the hopeless romantic that I am, I made my boyfriend a Valentines cake. I was a bit apprehensive about how it would turn out because to date, it was the largest cake I would have iced with fondant icing ( and it wasnt even that big!) .

The cake baked lovely and the aroma coming from the oven whilst it was cooking was amazing.. you cannot beat the smell of home baking!!

I went for a sandwich cake with a buttercream and jam filling, classic and tasty.

One the cake was cooled and filling was done I began to decorate. Icing first of course... I rolled it out till the diameter was enough to cover the whole cake. I then put a thin layer of buttercream on the cake so that when the icing was put in place it would hold nicely. After placing the icing over the cake I used a new purchase of mine, an icing smoother (which really looks like a trowel that a plasterer uses to smooth walls!!) and smoothed the icing over the cake and worked the icing into a round shape so it was a smooth sheet covering the whole cake. These smoothers are available on ebay very cheap, I think mine was around £3 and it is brilliant!
I then dyed some of my leftover icing pink and made a rose flower out of it and placed it on the left hand side of the cake. To use up the rest of my icing I placed pink love hearts all over the cake and wrapped the cake in a Valentines Ribbon (which I also got from Ebay for next to nothing) and added a little message ' To my Valentine'. My boyfriend was chuffed. I was glad, as I think making something from scratch for your partner is so much more creative and loving than buying something commercial and silly from the shops! The cake was lovely (if I do say so myself) and the sponge came out perfect. Biggest cake achievement to date!


Beginning of 2012...

Its now a new year, which means new challenges! I am excited for the new year and what it will bring as I feel that a lot will change in my life this year (I hope). One thing that will continue this year however is my cake making and hopefully it will only improve. For Christmas, myself and my work collegues did a Secret Santa and of course I got a cake related gift (they know me so well!). 'Santa' got me a cupcake set which included a cute mixing bowl with a cupcake pattern on it, a spatula, a cake mix and a jellybean cupcake recipe. Of course it would be rude not to make use of it, so I made some cute mini jelly bean cupcakes!

Any excuse to make some cakes ey!!!


Thursday 8 March 2012

Happy New Year!


I made these New Year's cupcakes for my friends to bring in the New Year. I experimented with a few different designs that are all New Year themed! I enjoyed sharing them with friends who all really enjoyed them... so much so... they ended up covering their faces in the icing!! Great night, great cake and great friends.

Tuesday 6 March 2012

Christmas cakey treats...

Christmas is the perfect time for indulging and making some yummy treats for the family. With extra time off work, I was able to try a few different festive recipes. First up was a Christmas pudding which was actually made by my Aunty but decorated by me. This was the first cake I iced with marzipan and icing and for a first attempt I think I did ok! With a couple of festive decorations, my mum shared this cake with her friends over present exchange night! I found that by dusting both the work surface and the rolling pin with icing sugar aswell as adding icing sugar to the top side of the fondant icing to stop it sticking to the rolling pin, the icing lost its colour and appeared more powdery than I desired but lesson learned... I now know not to do this again. I now put a dusting of icing sugar on the work surface and a slight dusting on the rolling pin so the colour and appearance of the icing is not affected. I ensure that when placing the icing over the cake, I keep the top side of the icing upwards as it has better colouring and appearance than the underneath side which has had direct contact with more icing sugar.

Next up on my festive list was a christmas roulade. I got the recipe for this roulade from a Christmas edition of You magazine and it was easy to follow. I expected the roulade to have a spongey texture but infact it has more of a meringue texture and is very light. Whilst the roulade is still flat before rolling, I coated it with a thick layer of a homemade creamy sweet filling. I then rolled the roulade with the guidance of a piece of baking paper. The recipe said the more cracks and imperfections, the better the roulade so I was pretty chuffed with the outcome. I added a few festive decorations and sprinkled icing sugar over it to give it a snowy christmassy appearance. This cake went down well on Christmas night..once we had enough room after dinner!!

And last but not least... My Christmas tree cupcakes! I made these cupcakes to share with work mates over our Christmas meal. I made chocolate sponge cupcakes then piped green buttercream in the shape of Christmas trees (which took a few attempts before perfecting), then added edible balls to imitate baubles and topped the buttercream with gold stars. I was very happy with these cupcakes and think they would be perfect sweet snacks for a Christmas get together! I will definately be making these next year again.

The icing on the cake!

Baking cupcakes with simple decorations and recipes became too easy for me so I decided to turn my hand to experimenting with fondant icing designs. Until now I have usually decorated my cakes with glaze icing or butter icing which are easy to spread onto cupcakes and cakes and can be easily scraped off and recoated if there is a disaster or can be redone to improve the appearance of the cake. I decided to set myself the challenge to make rose flowers out of fondant icing and this was the first attempt...
Not bad for a first attempt? As I got more confident and got the technique right, my flowers began to improve and lost their jagged edge and had smoother more petal like edges.

I find the best way to do to the flowers is to roll pea size balls of icing with a rolling pin between two sheets of clingfilm. This saves the hassle of spreading icing sugar over a work surface and prevents the problem of the icing sticking to the rolling pin and breaking or cracking.

Begin by make a cone shape with a sturdy bottom section as this will be used to wrap the petals around so needs to be able to carry the weight of the flower. After rolling out a pea sized ball of icing into a petal shape, wrap it tightly around the cone to form the centre of the flower; the bud. Then continue to do this process several times but peel the tops of the petals out slightly to shape them into outer petals. The more petals you add, the wider they should be to make the outer petals more dispersed to imitate a flower in bloom. Once you have a wide flower, the bottom section of the cone can be cut off and only the flower will remain. This can then be placed directly onto the cake or cupcake.  Voila... Pink Rose Cupcakes!

Everyone loves a Sundae...

Naughty but nice cherry sundae cupcakes. Whipped cream topped with chopped almond pieces and drizzled with a homemade chocolate fudge sauce; melted plain chocolate mixed with golden syrup to give it a gloopy and thick texture. To finish of the cakes, I topped them with juicy fruity cherries. These went down well with my family and were a great treat on a Sunday evening with a cup of tea!

Monday 5 March 2012

'99 Flake Cupcakes

After buying a little cupcake recipe book in The Works for only £5.. I decided to try a few different recipes. One of the first recipes I tried out was '99 Flake cupcakes. The recipe was easy to follow and the decoration was simple and can be bought from any supermarket.. All you need is a few Cadbury Flake chocolate bars and some coloured sprinkles to decorate.

Again.. Easy to make with a simple vanilla cupcake recipe. Once the cakes were cooled, I piped buttercream on them to have the appearance of a classic '99 Flake ice cream. Topped with coloured sprinkle and a section of a chocolate flake...the '99 Flake cupcakes were complete. My friends loved them!

Vanilla Sponge Butterfly Cupcakes...

My love for baking cakes began when I offered to help a friend make cakes for a local school fete, I had made cupcakes before when I was younger but being young, the interest didnt last very long!                                                                        The cakes I made for the school fete were these classic butterfly cupcakes with a cream and jam centre, simple to make and popular with everyone. Using a simple vanilla cupcake recipe, the cakes were baked for roughly 20mins.
Once the cakes were cooled, I cut a small circle incision around the top of each cake and removed the cut out circle of sponge and set it aside. I then filled the hole with a dollop of jam topped with whipped double cream. To finish off the cakes, I cut the circle of sponge which I earlier set aside into two even pieces and placed them on top of the cream to give the effect of butterfly wings. A slight dusting of icing sugar dresses the cakes up to make them look more appealing.

After making these cakes several times and perfecting the sponge I made a few variations of butterfly cakes including chocolate butterfly cakes and lemon butterfly cakes. All just as easy and all just as delicious! Perfect cakes to go with a cup of tea or coffee and always go down well at a party!

Welcome Cake Lovers!

Hi Cake lovers,
Welcome to my blog. I have created this blog to share my love for baking cakes and cupcakes! I will share with you cakes I have made, recipes I love and pictures of cakes I have made for friends and family as I only currently make cakes as a passtime/hobby. Some people find the gym therapeutic, others enjoy pampering themselves, some enjoy sport and some just enjoy a great cup of tea to help them unwind. I find baking cakes therapeutic. I love the smell of cakes baking in the oven, the enjoyment when you bake something new and its a success, the skill and patience that goes into decorating cakes and the trial and error process that only makes you better at baking. I hope you enjoy my blog and find some of my hints/ recipes work as well for you as they have done for me.
Laura x