Friday 28 December 2012

Happy Chrismakkah...

To celebrate Christmas and Hannukah, a friend of mine recently had a little gathering and she had the fab idea of combining both celebrations to make it 'Chrismakkah'. I couldn't resist but to make a little cake to bring along with me to add to her delicious spread. Another sweet festive treat :-)


Festive Treats...

Hi All,
   Its been a while since I blogged.. had a very busy few months. Had a well deserved break over Christmas so have been using the time to do a little baking!

I made a few festive cupcakes and some homemade mince pies and hoping to make some new years themed cupcakes over the next few days. Will hopefully get the pictures up for them soon!

I got a few ideas for my christmas cupcakes off google images and found the recipe for my mince pies at  the bbcfood website. 

I did a few different designs on the cakes... holly leaves, stars, christmas bauble and a present cupcake to have a few different christmas themes.

I baked the mince pies in a muffin tin as I left it too late to order individual foil wraps before christmas and it worked fine. All the mince pies came out the same size and depth which was what I hoped for and they were easy to get out of the tin (which was the main thing I was worried about).

I have attached a few photos of my festive treats... Hope you all had a Merry Christmas and have a happy and healthy New Year x


Friday 21 September 2012

Lemon Cupcakes...


I made some delicious lemon cupcakes for a dinner party as a thank you to the host and the other guests. Although we had already stuffed our faces with a three course meal, we all found enough room to eat one and they were lovely.
I decorated the cakes with fresh slices of lemon which unfortunately began to dry out which was a shame. The lemon juice from the slices leaked over the cakes slightly as well but didn't spoil them!
 
If I was to make them again I would do it slightly different and maybe just decorate them with lemon zest or lemon sugary sweets to keep with the theme. I got the recipe from one of my favourite recipe books and they had just the right amount of flavour.
 
A classic cupcake recipe which is a favourite with everyone.


Home Sweet Home Cupcakes...

I bought a cute set of letter embossers which are small enough to print onto cupcakes so I had to try them straight away. I bought them of an online cupcake supply store for about £10 and I love them!!
They come in a little presentation box and have the letters written on the top so it is clearer to know what letter you are using. They are about 8 or 9mm so small enough to write words/ phrases on your cupcakes. They work by pressing your selected letters to spell out a word and you press them into the icing and they leave an indentation of the letters you have used, very cute! There are a few different types you can get depending on whether you want upper case or lower case lettering.

A friend of mine had just moved house so I used the embossers to decorate some Home Sweet Home cupcakes!

Putting a personal message on cupcakes is always nice and the recipient usually loves it. You cant beat saying something by saying it with a cupcake :-)
xoxo

Girls Christening Cake...


I made an open book Christening cake for a baby girl to celebrate her special day. I got some ideas of pictures I found off google and got to work.

I decided to go for a classic Christening cake, the open book style which is always lovely and symbolic for such an occasion.

In order to get the open book shape I used two disposable foil rectangular baking trays to cook two sponge cakes. I then sandwiched each sponge cake by cutting them in half and filling them with butter cream and jam. I then pushed the two cakes together and trimmed them so they were shaped more like a book.

I did this by using a carving knife to shape the top of the sponge cakes into an oval shape and cutting away at the centre to give it an arched appearance like the centre of a book. I then trimmed the outside edges to give them a straight even edge that matches on both sides of the cake.

I then crumb coated the cake to give it a nice smooth finish before icing it, spreading the coating evenly to follow the book shape.

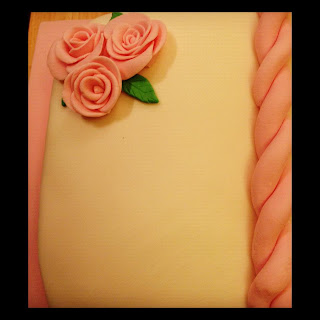
After icing the cake, I used a smoother to give the icing a smooth even finish that moulds around the book shape. I went for a white a pink theme, nice and girly!

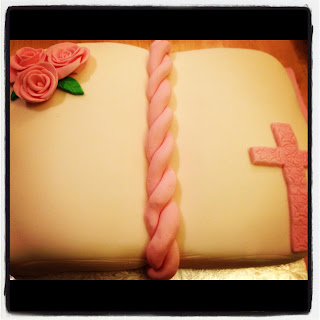
It was then time to add some some detail to the cake so I started with a flower corsage on one side of the cake, making three pink roses and adding some dainty rose leaves to add a little more colour.

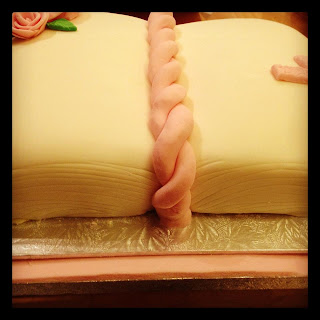
I made a plait design for the book mark which gave the cake some character which was a lovely idea I got off the Internet.

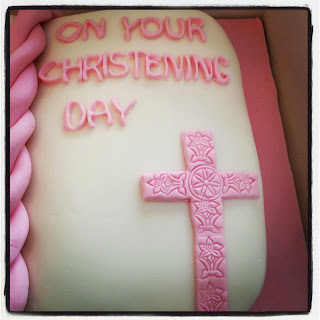
On the other side of the cake I stencilled on a Holy cross and embossed it with a pattern to make it stand out.

I used a cocktail stick to gently make page lines at the bottom and the top of the cake to make the cake look more realistic and book like. This only needs to be done gently, if done too hard it can make the cake look scratched and could cause bits to peel away from the icing which might the look so do this very gently and don't dig the very end of the cocktail stick into the cake.. brush the cocktail stick along the cake rather than scratching the marks into it.


After doing this it was then time to add the personalised touches by adding a name and adding On Your Christening Day to the cake. Their are many personal messages you can put on a cake like this and some people like adding a date of birth or the date of the Christening but I was worried about overcrowding the cake so left these off.

The amount of detail you can add essential boils down the the size of the cake. Mine was about 12 x 10 so was an average size.

Open Book cakes can be used for many different occasions like Christenings, Holy Communions, Confirmations, Weddings, Anniversaries, Graduations.. the possibilities are endless!

I really enjoyed doing this style of cake and it will definitely be one I will do again for different occasions!

xoxox


Sunday 16 September 2012

Whoppie Pies...

I was given a whoppie pie recipe book for my birthday last year and have only just got around to trying out a recipe for them! I bought a whoopie pie tin which was reduced at the time (bargain!) so I had no excuse not to make them!

A whoppie pie is basically a cake sandwich with a sweet filling, there are so many different recipes to choose from, the options are endless!

I was making them to bring to a friend's dinner party and everyone attending are huge chocoholics so I opted for a chocolate recipe to start with, with a marshmellow filling.

Whoopie pies are so quick to make and cook, I was surprised how easy they were to make and they take barely no time in the oven to cook. They are light and a great alternative to cupcakes.

They are a perfect party treat and take no preparation at all. I would recommend them for any cake baker who is short of time but still wants a sweet treat.

Hello Kitty Cake...

I made a Hello Kitty cake for a friend of mines little girl for her birthday. I got a few ideas off the internet and decided to go for a really girly theme so went for everything pink!

I made a traditional vanilla sponge with a buttercream and jam filling.

To decorate I covered the cake in pastel pink sugar paste.

I then made the main centre piece for the cake, a Hello Kitty face made from white sugarpaste, strengthened with tylo to help the ears stay rigid. I made a small red bow and placed this under one ear as Hello Kitty typical has then added the eyes and whiskers. For the whiskers I strenghtened black sugarpaste with tylo and propped them up to keep them strong however they did droop a bit which was disappointing. I think I made them to thick and heavy. Next time I will make sure I make them thinner and lighter or use a different method to make the whiskers completly. Practise makes perfect :-)

I put the finishing touches on the cake by adding a name banner and small sugarpaste flowers with pearl dragees in the centre.

To keep with the girly theme I used a pretty pink bow to wrap around the cake.

Thankyou Cupcakes

I recently bought some different sized pastry cutters so I thought I would test them out whilst making some thank you cupcakes for a friend. I used them to cut the icing into a nice frilled edge and thought they made the cupcakes look cute and presentable. I then topped the cupcakes with miniture flowers. and embossed them with thank you letters. A lovely gift, and the perfect way to say thank you.


Thursday 12 July 2012

Paul Weller Cake...

I made a Paul Weller themed cake for a friend's 50th birthday as she is a massive Paul Weller fan! Her family picked a picture of Paul Weller and I had it transferred onto an edible icing sheet which I did through a website. There are a few websites which can do this and they post within a few working days.

For this cake I used the chocolate recipe off the BBC food wesbite as it is easy and delicious! Again I used a fresh cream and raspberry jam filling and it came out perfect.

Sticking with the music theme I cut out some music notes and guitar shapes from icing, free hand! I was quite impressed with myself!! I bought a music note cake ribbon from a local cake shop and set the cake on a cake board covered in red icing to bring a bit of colour into the cake.


Tinkerbell cake...

I made a tinkerbell cake for my cousin for her 3rd birthday. I had looked at a few tinkerbell cakes on the internet so had a rough idea of what I wanted to do. As long as there was plenty of chocolate flavour, glitter and tinkerbell...I knew she would be happy!!

I bought a little tinkerbell figure from Ebay but small tinkerbell dolls can be bought in supermarkets for around £6 as well (i only noticed this after I had bought the figure, but i still saved a pound!)

I bought violet coloured sugarpaste dye to colour a kilo of white icing I had bought, adding very small amounts at a time using a cocktail stick and dragging it across the icing, then kneeding it in to gain a consistent all over lilac colour. The more dye that is added, the stronger the colour will be. I used the lilac icing as the main colour on the cake.

I then repeated this method with leaf green dye paste and dyed some white icing I had set aside.
I used pink icing to create a flower for the centre of my cake to sit tinkerbell on. I applied edible glitter to the icing and cut the icing into petal shapes amd placed them in the centre of the cake, resting tinkerbell on top. I rolled the green icing into sausage shapes, being slightly thicker at one end and added them round the sides of the cake, curling them round at the top to look like stems. Using a petal cutter, I then cut out some leaf shapes to add to the end of the stems. I used a cocktail stick to vein the leaves to give them a more realistic appearance.

To finish off the cake I add some personal details and added some large colourful flowers around the base of the cake and set it on a large cake board.

The cake itself was a chocolate cake with a fresh cream and raspberry jam filling and it was lovely. I got the recipe of the BBC food website, see the link below for the recipe. It is easy to make and the recipe is easy to follow and it turns out lovely!
http://www.bbc.co.uk/food/recipes/easy_chocolate_birthday_90089

Happy baking!! xox

Jubilee Celebration Cupcakes...

For the Jubilee weekend, I made some cupcakes for my friend's house warming party. I used two different decorations, one being the classic crown, a symbol of royalty and a representation of the queen and the other being a cameo icing design of the queens head. I used blue and red buttercream ( in the british spirit!) and used peppermint flavouring to kick up the flavour! I got some festive union jack cupcake cases in a local cake shop to add to the jubilee theme. I got the cameo icing mould with the cake decorating magazine that i collect. Details of the magazine can be found at http://www.mycakedecorating.co.uk/

Wednesday 11 July 2012

Superman cake...

I recently made a superman cake for a little superman fanatic for his birthday party... And he loved it.
I used a simple vanilla sponge recipe with a buttercream and jam filling.

To decorate I bought a cheap superman stencil from Ebay and used that to make the famous superman logo using red and yellow icing. Once the stencil was made the rest was pretty easy!

I iced the cake with a bright blue sugarpaste and set the superman stencil as a centre piece on the cake.

As a finishing touch I added the age and name to personalise it. To break up the amount of blue icing, I used my left over yellow icing to add balls around the top edges of the cake and they held well with some glaze icing.

The logo is the trickiest part but I would definitely recommend buying a cheap stencil or make your own by printing the superman logo onto a sheet of cardboard and work around the cardboard to create the logo. Cheap and cheerful yet just as good as a professional stencil. The stencil I bought was designed for spraying the superman logo onto something ie. a wall but it worked fine and I was happy with the outcome!

Spiderman Cupcakes...

Hi Everyone, its been a while since I have found some spare time to blog so I have a lot of catching up to do!! Been busy baking over the last two months.

I would like to share with you my spiderman cupcakes which I made for a five year old's birthday party.

I used my jam centred cupcake recipe where you gently place just under half a teaspoon of jam on top of the cake mix before it goes in the oven... Once cooked and cut down the centre the jam should have set in the middle (or near the middle) of the cupcakes. If you have put too much jam it will sink to the bottom of the mixture so will be basically the base of the cake which is no fun!!

After trimming the points (domes) of the tops of my cupcakes to make them flatter, I proceeded to make my spiderman design. I did a spiderman face design so started off with 12 red circles of icing to fit the tops of the cupcakes as shown in the photo below.
I then began to paint on the spiderman mask features with black edible paint and a fine paintbrush (icing brush), beginning with a cross, then extending the amount of lines to create a pattern with 8 small diagonal lines meeting in the centre as illustrated in the photo below...
Next was to create the web effect. I started on the outside of the icing and made small arched inward lines between each existing line and worked towards the centre of the icing... The first step can be seen in the picture below...
Repeat this process once more (or twice if you would like), creating an inner webbed pattern. Once completed they should look like this....

The last step is to add the eyes. I did this by cutting out small white triangles of icing and outlining them with the black edible paint then attached them to the cakes and they looked really effective. I used a thin layer of buttercream spread on the top of the cupcake to hold the icing in place. Below is the finished product...
So for an easy recipe perfect for any little boy who is a spiderman fanatic, these cupcakes are perfect!

Happy Baking xox

Monday 21 May 2012

Holy Communion cakes...

My latest task was to make a Holy Communion cake and cupcakes. I had so many ideas and wanted to try them all!

I knew the cake had to be simple and elegant so I went for a traditional vanilla sponge with a buttercream and jam filling. I covered the cake with white sugarpaste and used letter embossers to imprint a personal message and date. I used edible food paint to shade in the letters and I went for a silver shade and it came out perfect. It was subtle and elegant and brightened up the look of the cake.

The main feature of my cake was a Holy Cross. I bought a cross stencil on Ebay and it was brilliant. It included a floral pattern embosser to create a pattern on the cross and also came with small embossers to create fancy edges on each corner of the cross. It came out brilliant. To highlight the patterns on the cross, I again coated the cross with the silver food paint and it looked lovely. I was very happy with how it came out and it really brightened up the cake and gave it a feature.


The small book beside the cross is one of my sugarpaste bibles! I made the bibles to use as cupcake toppers and I personalised them by putting a name on one side and a holy cross on the other,imitating an open book. These were easy to make and are just a matter of shaping and moulding into the shape of a book and decorating as you wish. I used a light brown sugarpaste as the base (cover of the book) and white sugarpaste for the top section (pages of the book). I used a cocktail stick to score page lines along the sides, front and back of the book but these were subtle so cannot be seen in the photo.


The cakes were for a young girl and every young girls loves a bit of pink so I dressed up the cake with a pink border around the front and back of the bow and finished my presenting the cake with a pink and silver bow. To match the cake, I decorated the cupcakes with a strawberry flavoured buttercream and then topped the buttercream with the Bible toppers. I also added a few pink edible flowers to the cross to give it a girly edge.


Monday 14 May 2012

Icing Nozzles

I have recently been experimenting a bit more with different icing nozzles to create different looks on my cakes. I have bought two new nozzles, one was a straight round large nozzle and one was an open star large nozzle. Both create different icing patterns.
The large round straight edge nozzle creates a smooth circular icing pattern and the open star nozzle creates a rose like pattern when piped from the centre of the cake out towards the edges.
I used each nozzle to create different looks for different events.
I used the round nozzle to decorate cupcakes being used as part of a buffet spread and I used two colours of buttercream to create a blended look. I achieved this look by placing the two shades of buttercream into a piping bag at the same time; putting one colour of icing down the left side of the bag and the other down the right side of the bag and pushing them equally down towards the nozzles so equal amounts of the two shades of buttercream come out of the nozzle.
To finish the cupcakes I topped them with fondant letters to suit the event I made them for.

The open star nozzle creates an elegant rose flower design if piped from the centre of the cake out towards the edges. This gives a pretty design to the cakes and is delicate and suitable for most parties and events. I will definately be using this nozzle a lot!


Tuesday 8 May 2012

Icecream Cone Cupcakes...

I saw the idea for these cakes on the internet and knew I had to try them out! They are cupcakes baked in an icecream cone rather than a cupcake case. They are made the same as a normal cupcake so are simple to make! I decided for my first attempt at making these cakes I would just make a simple vanilla sponge mix as I was unsure about how they would turn out but they turned out fab!
I filled the cones with batter to just over half way up as I didnt want them to spill over the top and spoil the look, it was just the right amount. I secured the cones in a cupcake tin with tin foil to stop them toppling. I covered the whole tin with tinfoil then pierced holes where each cupcake should sit and i pushed the cones into the holes so they were secure. I gently banged the tray off the surface to make sure the mixture had reached the bottom of the cone.

After baking for 20minutes I pierced holes in the bottom of the cone with a fork to let the heat out and to prevent the cones going soggy whilst they were cooling down. Once cooled, it was time to decorate. The mixture spread perfectly down the length of the cone and the cone remained crunchy and fresh.

I used a two tone icing topping with blue and yellow buttercream and piped it like a traditional 99' cone and topped with coloured sprinkles.


Perfect cakes for a childrens party and are a great spin off from the traditional cupcake!


My cousin described these cakes as "The funnest cupcake I have ever eaten"